 >
>  > > >
> > >  Whenever you double-click on a file, Windows 7 will check the registry (a big, virtual catalog), to see which application is registered as the handler for that type of file. That's called "the default program"; you can make any program open any type of file, and that process is called "file association". A specific file extension becomes associated with a particular program. In this tutorial, we'll show you two-three ways of changing the default program, starting with the easiest, and ending by showing you how to change the default handler for specific extensions and protocols. We'll close by showing you a trick that allows you to launch a file in a particular program, regardless of what the default program currently is for that particular file type! And how to "just this one time" use another program to open a specific file, temporarily bypassing the default handler.
Quick Steps to set a default program in Windows 7:
The easiest way to change the default file handler is to go through Windows Explorer. Let's take a text file, for example (".txt" file extension, visible or not). Right-click on the file and choose "Open with" from the context menu. You'll get a list of common handlers for that file type. In our case, if you chose Notepad, TextPad, or WordPad, the file would open with that application just this one time. If you just double-click on the file, it will open with the default program currently set in Windows 7: 
FYI: some applications can add themselves to the standard context menu in Windows Explorer. That's why you see the "TextPad" editor in that menu, even if it's not currently the default program.
Click on the last item of that submenu, "Choose default program", to pick a different default application. A popup / dialog will open, listing at least as many applications as the ones listed in the submenu. To make one of those the default program, click on it, make sure that the "Always use the selected program to open this kind of file" checkbox is checked, and click OK: 
HTML-web page- file) appears with either the Google Chrome or Internet Explorer icon, depending on which web browser is currently set as the default.
You can pick any program you want to handle a certain file type / file extension: just make sure that this application does in fact support that type of file. Coming from the folder listing, follow the same steps: right-click on the file, choose "Open with", and click "Choose default program". But this time, when the dialog opens, click instead on the down-pointing arrow next to "Other Programs": Windows 7 will display all programs it thinks are capable of handling that particular file, and therefore could be set as the default. If one them is the application you were looking for, click on it once to select it: 
 If you don't see the program listed, click on the Browse button in that same dialog: navigate through your Program Files folder (where Windows stores all your applications by default). On a 32-bit version of Windows 7, everything is inside the "Program Files" folder. On a 64-bit version of Windows 7, you have two folders: "Program Files" stores all the 64-bit optimized applications, and the "Program Files (x86)" stores all 32-bit applications, which can also run on 64-bit versions of Windows. Most programs will be inside the "Program Files (x86)" folder. Once you've chosen your default application, click on the OK button at the bottom:
Tip: notice the "look for the appropriate program on the Web" link in the screenshot above? If you click on it, a new browser window will open to Microsoft's website, with a list of apps that can handle the file extension of the type of file on which you right-clicked at the beginning (example). You can type another file extension in the browser's address bar to see what Microsoft recommends:
 Another, longer, but more flexible way to set your default programs is to go through the Windows 7 Control Panel: click on the start button and type "
default program
" in the search field. Click on the first result listed under Control Panel (see the screenshot as example). 
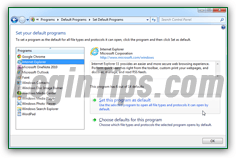
The first two links are the ones you're interested in: "Set your default programs" allows you to pick an application, and make it the default for one or all of the file types and protocols it can handle. Click on that link and look at the list of applications that Windows has "recognized". If the one you want is in the list, click on it to select it. If it reads "This program has all its defaults on the right
", nothing left to do. You're already set; otherwise, you have two choices. Clicking "Set this program as default" will make that application take over all the file types and protocols it can handle - not necessarily what you want! Instead, consider clicking on the "Choose defaults for this program" button. It will give you granular control over which file types and/or protocols you want that program to handle - click OK once done: 
The "Associate a file type or protocol with a program" link goes the other way around: find a file extension (or protocol, all of which are listed at the bottom), and pick a program to handle them. Heads up: the list of extensions can take a long time to load. The list is long to begin with, and becomes longer every time your PC learns to handle a new type of file - that typically happens when you install a new program, or add new MIME types to your machine. Click to select the first extension and type the one you are looking for, starting with a period (remembering that trick will save you lots of scrolling :) Then, click on the "Change program" button to find another application: 
Note: there's a difference between "file type" and "file extension". Files ending in ".htm", ".html", ".phtml" (etc.) are all HTML documents (that's the file type), but their extension is different.
 Scroll down to the very bottom to find the protocol currently registered with Windows 7 on your computer. Notice "
mailto:" - this is the one that handles email address links on web pages (some less popular desktop email programs are not always recognized by Windows, and therefore not listed in the previous screen, where you choose defaults based on selecting a specific application). That's what you would change to set the default email program to an application not listed in the other screen.
 The default program settings in Windows 7 control, well, the default behavior: when you double-click on a file, Windows forwards the path of that file to the default application (saved in the registry), which in turns displays the information it contains. But you can override that behavior by creating a custom shortcut.
Remember when we set, earlier, Metapad as the default program for text files (for the ".txt" extension anyway)? Assume that you want a particular TXT file to always open in Notepad - for example, a file that automatically includes the date and time when you open it (See our "Automatically insert date when opening Notepad" tutorial - a nifty feature when you log events manually). In that case, copy and paste an existing shortcut to Notepad (see note below), and add a file path as "argument": right-click on the shortcut you just created and choose "Properties". The "Shortcut" tab should automatically be selected; paste the full path of the file name at the end of the "Target" text field, and click OK to save the change. Optionally rename your shortcut to something meaningful: 
Create link in [folder name]" tooltip, you're ready to drop the shortcut. You can cancel the drag-drop operation by hitting Esc. From Windows Explorer, you can also right-click on an empty area of the folder, and choose "New > Shortcut".
 Only download programs from trustworthy websites; always have an up-to-date antivirus software installed and running on your computer (you can
  Tip - hold down the Alt key when dragging a program or a shortcut from its current location to another: that will create a shortcut. When Windows shows the "