 >
>  > > >
> > >  Having a mobile phone number associated with your Facebook account is not just convenient (use Facebook from anywhere!), but also a very easy way to increase the security of your profile: you'll be able to get login notifications when a new device tries to sign into your account, optionally send and receive messages straight from your cell phone (even without the mobile app), and you'll have the ability to post photos and videos to your timeline simply by emailing them to your unique "post-by" email address - no need to login to your account:
  just upload directly from the camera app on your device! This tutorial shows you how to add or delete phone numbers, and how to customize mobile options to limit your phone's involvement. Another advantage is the ability to login using "
two-factor authentication
", with Login Approvals: in addition to your username and password, you enter a security code generated by, or sent to, your cell phone: without it, no-one else can sign into your account, even if they know your password!
Tip: once you've associated a mobile phone number with your Facebook account, you can enter it as username in the login form (instead of typing an email address as you usually do; pick your favorite - either one will work!)
Quick Steps to add a mobile phone to Facebook:
 Click on the down arrow (top right corner), and choose "Settings" from the dropdown menu. On the next screen, select "Mobile" on the left. The direct link to that screen, assuming that you are already logged in, is this page.
 If you don't have any phone number associated with your Facebook account, you'll see a green "+ Add a Phone" button. Click on it: if prompted to do so, re-enter your account password and click "Submit". In the Activate Facebook Texts popup, choose your cell phone's Country, and pick a Mobile Carrier from the dropdown menu - then, click Next. (If your cell carrier is not listed in the dropdown list, just click on the "add your phone number here" link to proceed.)
Note: your cell phone number doesn't have to match your registered home country. In fact, you can have multiple cell phone numbers associated with your account, so feel free to add disposable cell numbers when you are traveling abroad (the security benefits of having a phone associated to your profile are even greater when you are on the move, and likely to use a computer that isn't yours!)
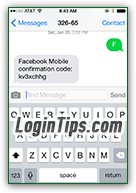 Using the cell phone you want to register, send an SMS text message containing just the letter "F" to "
32665" (the number spells "Facebook
") - the actual number you are given will depend on your phone's country code.
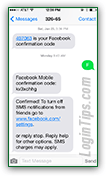
Within a few seconds, you'll get a message back that reads "Facebook Mobile confirmation code: ...
" Follows an 8-digit combination of lowercase letters and numbers. Carefully type them inside the text box in your browser.
Before clicking Next, please see the privacy caveat below: it determines how your phone will be used, and its visibility in your profile.
Caveat: if you leave the "Share my phone number with my friends" checkbox checked, your Facebook friends will be able to see it - uncheck it to hide your number. The "Allow friends to text me from Facebook" checkbox is also checked by default: uncheck it if you want to keep your Facebook activity under control: you can always load the free mobile Facebook app for iOS (iPhone / iPod touch / iPad) or Android (Samsung, Nexus, Kindle Fire, etc.) if you want.
 If you're responsible for managing the Facebook page for your company, you can easily add your work cell phone in addition to your personal phone number. Just click on the "Add another mobile phone number" link: the rest of the process is exactly the same as above! The end of this tutorial explains how to delete a phone from your profile (hint: you don't really need to remove it from your account, since the same number can be associated with multiple profiles / company pages :)
If you've entered the correct code, the next screen will be an updated Mobile Options page, with your cell phone number at the top, and four new settings discussed below. (If you are done, just click on the Facebook logo in the top left corner of the page to return to your homepage!)
 The first option controls the phone number to which Facebook will send you notifications: this setting only matters once you've added at least another cell phone number (see next section). This is useful if you have a plan with unlimited text messages for one phone, but not the others: if that's the case, click on the "Edit" link next to "Text Messaging", and pick the phone you want to use for SMS.
The second setting lets you control when you receive text notifications from Facebook: click on the "Edit" link next to "Facebook Messages" to configure that option. Here are the three options: 
- "When someone sends me a Message on web or mobile
" is the default choice: you'll get a text message whenever another Facebook user messages you.
-  If you pick "
When someone sends me a Message on mobile
", you'll get SMS texts only if someone is contacting you from another mobile device: you'll still receive all your other messages, but you'll have to get them by clicking on the double-bubble-callout icon (highlighted on the screenshot).
- If you choose "Never
", the only text messages you'll get from Facebook are the ones you need, like login notifications (if enabled), password reset instructions, and other account management info.
(Click "Close" when you are done.)
 The third option lets you determine the maximum number of text messages per day Facebook will send you: this is a great option if your mobile plan charges you after "x" SMS messages per month. By default, it is set to "
Unlimited
": to change that, click on the "Edit" link next to "Daily Text Limit".
The table below shows the numeric values per day, and their monthly equivalent (to make it easier if you are calculating your maximum number of messages on a monthly basis :) When you pick your number, remember that this only includes texts from Facebook! When you are done, click on the "Save Changes" button.
| Daily maximum... | Corresponds to... (messages per month) |
|---|---|
| 1 | 30 |
| 5 | 150 |
| 10 | 300 |
| 15 | 450 |
| 20 | 600 |
| 25 | 750 |
| 50 | 1,500 |
| 75 | 2,250 |
| 100 | 3,000 |
Tip: a way to quickly disable text notifications while "on the go"? Just send the word "stop" as an SMS text message to the number you used to activate your cell phone! ("32665" for the US.)
 Once you've added a mobile device to your account, you can use it to quickly post photos or videos to your timeline from any email app: the last setting is your "Post-by-email Address". Click on the Edit link to reveal it: it will have a random and unique user name, followed by "
@m.facebook.com" (where "m
" stands for mobile). Caution: never share that email address with anyone, because sending something to it would let anyone post anything on your wall! If you ever accidentally let someone else see it, you can change it to a different one by clicking on the "Reset post-by-email address" link.
FYI: before you spend time deleting phone numbers back and forth, remember that Facebook does allow you to have the same number associated with multiple profiles and/or pages (this is designed for the not so uncommon case where several people are sharing the same number, or multiple employees are in charge of managing the company's Facebook presence and marketing!)
 From that same screen (Dropdown arrow > Settings > Mobile Settings), click on the "Remove" link next to the phone number you want to dissociate from your profile or business / company page. To confirm that you want to delete that number, click on the blue "Remove Phone" button below the "
Are you sure you want to remove this phone?
" confirmation message. If you were set to receive login notifications and other account security information, keep in mind that those will no longer come - make sure that you regularly check your account for recent activity. Note that you can easily "re-add" any phone number previously deleted from your account.