 >
>  > > >
> > >  When redesigning Hotmail and renaming it Outlook.com, Microsoft unfortunately skipped porting an important feature: the ability to easily add a sender to your contacts, using an email you've received from that person. But we'll show you a workaround to achieving that, and how you can pressure Microsoft into restoring that feature. Then, we'll show you how to manually create new contacts in your "People" address book, including all kinds of fields you probably never knew were at your disposal - and how to best use them to make addressing your emails easier and quicker!
Quick Steps to create a new contact in Outlook.com:
 Note - I looked everywhere: the old Hotmail used to allow you to add a sender as contact in a couple of clicks, and most webmail providers offer the same functionality. But Outlook.com doesn't (seem to) give that ability. I'm assuming that Microsoft will ultimately add it back, but in the meantime, if you come across a trick or feature we've missed, please send your suggestion!
Tip - Microsoft listens: if you feel that this feature deserves to find its way back into Outlook.com, click on the gear icon (top right corner of your inbox), and choose "Feedback" from the menu.
For now, here's a half-baked workaround to make it easier and save you some typing: find an email sent by the person you want to add to your Contacts, and open it. Drag your cursor to select the sender's name and email address - then, right-click and choose "Copy" from the context menu:  We'll now show you how to create a contact from scratch - don't copy anything in the meantime!
 Once logged into your Hotmail account, click on the grid icon (top left corner of the page), and choose "People" from the dropdown - this is how Outlook.com calls your "Contacts". A new web browser tab will open: click on the New button at the top. (The dropdown arrow shows a menu that lets you create contact groups, aka "
distribution lists
".) 
John Doe" a nickname of "jd", and you can just type these two letters to quickly pick him as recipient!)
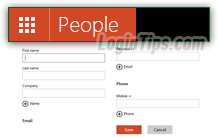
 The "Add new contact" screen will load next: Outlook.com only requires a single field of data to be able to create a contact, but we'd recommend typing at least the person's names, plus an email address - this makes your address book easier to manage, and gives you options when you search for contacts, or type their info in recipient fields.
So, enter a first name and last name in the first two fields; to add a nickname, click on the "⊕" round plus sign button, under "Company
") and click "Nickname".
Next, type an email address: notice that you can specify which type of address this is. It makes no difference as far as sending messages goes, but it illustrates Microsoft's attempt at appealing to both casual and pro users: if you explore all the available fields, you'll notice that the "People" address book is close to being a PIM ("Personal Information Manager
"), easily used for business purposes. Click on the plus sign to add a second email address: 
Note: if you came from the previous section (adding sender as contact), you can now right-click in the first text field and choose "Paste" - or hit Ctrl+V on Windows / Command+V in Mac OS X. Then, delete the parentheses and copy the email address, which you can paste in the next field :)
Feel free to add as much information as you want; pay particular attention to the last plus sign, labeled "Other
". It lets you add notes, birthdays, job titles, website URL, and other pieces of information useful for a conscientious sales person, like "anniversary
" or "significant other
"!
 Once done, click on the Save button at the bottom: Outlook.com will redirect you to that saved contact's "page", automatically selected on the left. Click on the People link in the top left corner to go back to your main Contacts screen, and optionally create new ones. Next, learn how to edit existing contacts' information - if you manually created a contact during this tutorial, much of that will already be familiar!
And that's how you create new contacts in your Hotmail account! We'll update this tutorial if Microsoft does end up adding a simple button or right-click menu item to directly add a sender to Contacts.
 Tip # 2 - if you are also checking your Outlook.com account from Windows Live Mail, know that you can add a sender as contact by right-clicking on the message and choosing "Add sender to contacts". If you have
  FYI: when you type names or email addresses in the recipient fields (To / Cc / Bcc), Outlook.com auto-completes suggestions based on your address book. Specifically, it uses four fields: the first name, last name, nickname, and email address - this is worth noting, since it gives you control over how efficiently you address your emails (example: give "