 >
>  > > >
> > >  Hotmail lets you easily forward emails you receive to one or more other recipients; the only (current) limitation is that you can only forward inline, and not as attachment, but we'll show you a workaround. To automatically forward messages to another email account, you can setup mail forwarding. Tech note: when a message is forwarded, it starts a new conversation thread. When your messages are shown in threads, as opposed to sequentially (by date, from newest to oldest), replies to your mail forward will become their own thread, not mixed with the origination conversation (from which you forwarded one particular message).
Quick Steps to forward emails from Hotmail / Outlook.com:
 You can manually forward emails from your Hotmail / Outlook.com account in a web browser by clicking on the dropdown arrow next to the "Reply" button, and selecting "Forward" from the menu. This will open a new message window, pre-populated with the subject line (prefixed with the "
FW:" acronym), and its "email body
" pre-filled with the original message's content. This also includes basic email headers that show from whom that original email was sent, to which recipients, and when: all this is editable text, so you can add, edit, or delete content as you will, like in a "normal" email.
Note: as long as the blinking insertion point (cursor) is not in an editable text field, you can use the Shift+F keyboard shortcut to forward the current message (the one that's opened in front of you, or the one whose checkbox is selected in the folder listing). In a text field, that just types an upper case "F" letter :) And contrary to what you might think, the F keyboard shortcut is not supported for flagging messages: to do that, hit the insert key (Ins), just as you would in Microsoft Outlook!
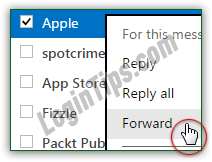
 As you can tell from the first screenshot in this tutorial, you can also right-click on a message in the folder listing, and choose "Forward" from the context menu. Just pick your favorite method and memorize it - the end result is identical. Just like the regular Forward command (explained below), this menu item will be invisible if more than one message is currently selected.
![]() Outlook.com keeps track of messages you have forwarded in a couple of ways. First, it will show a right-pointing arrow next to the message in the folder listing (see screenshot). Second, by default, Hotmail keeps a copy of all mail you send (new messages, replies, and forwards) inside the Sent folder. Just click on it on the left to view your sent messages. Emails to which you replied also show an arrow, but it is semi-circular, and points to the left. Unfortunately, unlike most email programs and some webmail providers, Outlook.com only keeps track of a single icon per message: this means that if you've forwarded the message and then replied to it, only the "
Outlook.com keeps track of messages you have forwarded in a couple of ways. First, it will show a right-pointing arrow next to the message in the folder listing (see screenshot). Second, by default, Hotmail keeps a copy of all mail you send (new messages, replies, and forwards) inside the Sent folder. Just click on it on the left to view your sent messages. Emails to which you replied also show an arrow, but it is semi-circular, and points to the left. Unfortunately, unlike most email programs and some webmail providers, Outlook.com only keeps track of a single icon per message: this means that if you've forwarded the message and then replied to it, only the "replied-to
" arrow icon will show up on the message. Here's the double-arrow icon implementation by the Rackspace webmail client, to show the "replied-to
" and "forwarded
" status: ![]()
Remember that Microsoft's webmail client can only forward emails inline, not as attachments. So, as soon as you have more than one message selected, Hotmail will hide the Reply, Reply-to-All, and Forward buttons . To be able to forward again, make sure that only one message is selected! Here's a screenshot of the toolbar at the top, depending on whether one or more emails are selected: 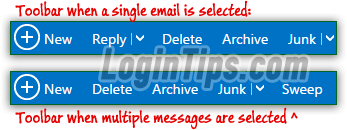
 This is what's called an inline email forward, because the message is forwarded inside the body of the new email, and not forwarded as an attachment. Forwarding emails as attachment can (currently) only be done from desktop email program like Microsoft Outlook, Windows Live Mail, Mac Mail, etc. - as well as mobile mail clients like iOS Mail (iPhone/iPad/iPod touch), Android Mail, etc. When you select multiple messages in such an email client, clicking / tapping on the forward command will automatically forward them as attachments, since you can -feasible- only have the content of one message in the body of another. The screenshot above shows three messages forwarded as email attachment in Windows Live Mail.
 FYI: to document that you've forwarded a message to someone, the best practice is to blind-carbon-copy the forward to yourself. This way, you can store your copy the forwarded message in the same folder as the original (or a folder you use for the recipient to whom you forwarded the message). Depending on how you access your Hotmail / Outlook.com account, you may not have access to the emails inside the Sent folder.
 Tip: if you want to be able to forward messages just like you would file attachments, setup your Outlook.com account in an email application; on Windows, the easiest is to