 >
>  > > >
> > >  If you switch from Google's Gmail webmail service to Microsoft's MSN / Hotmail / Outlook.com, you can have all your mail automatically forwarded to your new email address. And, unlike other webmail providers, Google will not disconnect your Gmail account if you don't log into for prolonged periods of time. Gmail also lets you selectively forward messages: by creating a mail filter, briefly covered in this tutorial, you can receive a copy of only the emails that match certain conditions. Any forwarded message can optionally be deleted from your Gmail inbox. Note: Hotmail also lets you create mail filters (aka "
email rules
"), but Outlook.com doesn't (yet?) support forwarding your mail as an action.
Quick Steps to forward your Gmail account to Outlook.com:
 You can login to other email accounts from Outlook.com (and even send emails from another account!), but setting up mail forwarding from Gmail will send all messages to a centralized inbox. So, login to your Gmail account; once in your inbox, click on the gear icon (near top right corner), and choose "Settings" from the dropdown. On the next screen, select the "Forwarding and POP/IMAP" tab. By default, the "Disable forwarding" option is selected (your emails only go to your Gmail inbox).
Tip: to only forward specific messages to Hotmail, just create a Gmail filter instead:
- Click on the "Create a new filter" link.
- Fill in the conditions to match particular emails.
- Click on the "Create filter with this search" link in the bottom right corner of the popup.
- Check "Forward it to" as rule, and select a forwarding email address.
- Click on the "Create filter" button at the bottom.
You'll then have the option of adding a new email address, or using an existing one:
 If you've never forwarded your messages from Gmail, or never added this particular Hotmail / Outlook.com address to your Gmail account, click on the "Add a forwarding address" button.
Type the full email address to which you want to forward your emails; it doesn't need to be another Gmail account: in this case, you'll enter your MSN.com / Live.com / Hotmail.com / Outlook.com email address (in the form username, "@" symbol, and domain). Click Next, then Proceed to confirm: 
To make sure that you own the forward-to email address, Google will send to it a confirmation message with a link: its subject reads "(#12345) Gmail Forwarding Confirmation
". Go find the message in your Hotmail inbox (or in the Junk folder if you don't see it in your inbox), and click on the link:  You'll get a confirmation: your forward-to email address will now be visible in your Gmail account! You may need to refresh the page; otherwise, enter the multi-digit code in the message, enter it under the "Forwarding and POP/IMAP" tab, and click on the Verify button, like this:
Note: if you haven't received any confirmation email from Google within a minute or two, just restart the process just by clicking on the "Re-send email" link, visible in the screenshot above.
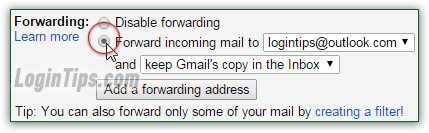
Now, still in your Gmail settings page, pick the "Forward a copy of incoming mail to" option, and select an email address from the dropdown on the right. If you see the words "(in use)
", it means that this particular address was the last one used, or the one currently used if mail forwarding is activated: 
 Gmail now lets you choose how it should handle forwarded mail. The least desirable option is to choose to "delete Gmail's copy": what if something happens when the message is forwarded? All other options let you keep a copy of the forwarded messages in your Gmail account, with one of three settings available: "keep Gmail's copy in the Inbox" will leave the messages, unread, inside your inbox; "keep Gmail's copy as read" does the same, but automatically marks as Read any message it forwarded: this is the best of both worlds, because you'll be able to tell which emails were forwarded whenever you login to your Gmail account. Finally, you can choose to automatically "archive Gmail's copy" of each email it forwarded.
When you are done, click on the "Save Changes" button at the very bottom: to make sure that your emails aren't forwarded without your knowledge or consent, Gmail will show a "You are forwarding your email to [email address]. This notice will end in 7 days
" pink notice at the top of the screen for about a week. Clicking on the "Review Settings" link brings you back to the mail forwarding page: ![]()
 If you no longer want to receive Gmail emails in your Hotmail / Outlook.com account, login to Gmail and go to Settings (gear icon > Settings > "Forwarding and POP/IMAP" tab). Select "Disable forwarding", and click Save Changes at the bottom. The change takes effect immediately: if you picked earlier the option of automatically deleting forwarded messages, those will be gone. Manually forward them from Hotmail back to Gmail!
 - In the Gmail Settings page, select the Filters tab.