 >
>  >
>  MSE / Windows Defender is, by default, scheduled to automatically scan your computer every Sunday at 2am (this day and time were picked since that's when people are least likely to use their PC). But you can change automatic scan's date and time, and even make MSE running every day of the week!
![]() Don't worry if your computer is turned off or goes to sleep at the scheduled time: Windows will automatically launch the scan the next time it is turned on, or woken from its sleep / hibernate state. That's why you'll sometimes see MSE with the orange information bar warning (and orange taskbar icon), letting you know that a virus scan is overdue!
Don't worry if your computer is turned off or goes to sleep at the scheduled time: Windows will automatically launch the scan the next time it is turned on, or woken from its sleep / hibernate state. That's why you'll sometimes see MSE with the orange information bar warning (and orange taskbar icon), letting you know that a virus scan is overdue!
Note: since MSE is by default enabled for "real time protection", the scan will be a "quick scan". This is fine for most purposes, since MSE will check the most commonly infected files and folders. But if you suspect that your computer might have become infected, you'll want to manually run a manual, full scan instead to check your entire computer.
Quick Steps to edit your automated virus scan:
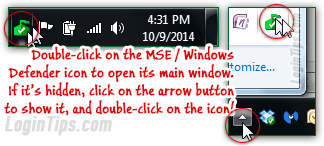
 Double-click on the MSE icon in the taskbar to open the main window: if it isn't visible, you may need to expand the hidden icons to show it. (If you are using Microsoft's latest operating systems, see "How to open Windows Defender in Windows 8 / 8.1".)
Once the main window has opened, make sure that the Home tab is selected: you will see your current scan schedule listed at the bottom of the window. The screenshot below shows the default setting. Click on the "Change my scan schedule" link to pick another day and time (this link is a shortcut, linking to the first option listed under the Settings tab). 
Tip: MSE (and Windows Defender) let you change which drives, folders, and files you scan for viruses - you can include or exclude external drives, ignore certain types of files or processes, etc.
 This will open the Settings tab, with the first option ("
Scheduled scan
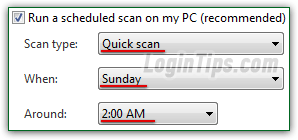
") automatically selected on the left. By default, the Quick Scan level is selected: since MSE / Windows Defender is running all the time, the real time protection feature (enabled by default) takes care of most threats. While more security is always good, it's often less convenient as well: a full scan can last hours, but it's better to have a quick scan go through completion, than a full scan that is interrupted (a quick scan prioritizes "threat mitigation" to the most popular attack areas). Pick your preferred setting from the "Scan type" dropdown menu.
Scan levels in MSE / Windows Defender:
- "Quick scan" checks for the most commonly infected areas of your computer. While it depends on multiple factors, a quick scan typically take about 10-20 minutes.
- A "Full scan" will go through everything on your PC to locate viruses and malware: this includes memory, system files, programs currently running, and all the file systems (files and folders). Note that only the main drive will be checked: to scan external drives, USB flash drives (etc.), you'll need to run a "Custom scan" (which can only be launched manually - we'll cover this in a later tutorial).
 Now pick a day from the When dropdown menu: if you want run a scan every day of the week, just pick "Daily" instead of a day.
Select a time at which the scan will run: this should ideally be a time at which your computer is turned on, but you're not heavily using it. Notice that the dropdown menu says "Around
", not "At
": this is once of the nice things about MSE / Windows Defender - how unobtrusive it is, which makes it a real pleasure to use! If the antivirus notices that a processor-intensive task is running, it will wait a bit before running its own scan. This is also an approximate time because the scan will run as soon as it can after this day and time if your PC was turned off or hibernating. (That's why a scan sometimes starts on its own right after you've logged into Windows!)
Tip: if you are using your computer while MSE scans your computer, and it slows you down, you can always manually cancel the scan (which takes administrative privileges). If you -or another Windows user- launched a manual scan, you can stop it without admin password: if no colored shield shows on the Cancel button (see screenshot), you'll know that this isn't an automatic scan:
There are a couple of options you can customize to control how the program will run in automatic-scan mode - all three settings are enabled by default in both MSE and Windows Defender:

Note: if you're working offline (not connected to the internet), MSE will still be able to scan your computer, but only using the last virus definition files it has.

Tip: if you don't know what processor you have, hold down thekey, and press the Pause or Break key (how it's labeled depends on your keyboard) to open your system profile in the Control Panel. Then, look at the middle section:
Assuming you have an Intel processor, you can look up its specs and manufacture date at ark.intel.com (just type your CPU number in the site's search box).
Depending on the changes you made, saving them will require "elevated privileges": if you see the Windows shield icon on the "Save changes" button, you'll need to be logged in as an administrator (not good - see below), or you'll need to enter the administrative user's password when saving: 
Caveat: you should never run as an administrator in Windows (and other operating systems for that matter). If you get infected by a virus, it will have the same rights as you do. If you are logged in as a "Standard User", the virus or malware will only be able to do limited damage to your PC.
 Though we don't recommend that you do that, MSE / Windows Defender allows you to completely turn off the scheduled scan. To disable that feature, uncheck the "Run a scheduled scan on my PC" checkbox. (If the automatic scheduling options are disabled (grayed out), it's because the scheduled scan has been turned off!)
Important: if you disable the automatic scan, remember that you are now responsible for manually running it yourself, on a regular basis. If you don't, and the type of infection you risk isn't caught by the real time protection feature, you'll have a virus on your PC without even knowing about it!


