 >
>  > > >
> > >  There are two ways you control your screen's brightness on a Windows 7 PC. First, through hardware: in the case of an all-in-one desktop, a laptop, or a tablet, you'll generally have control buttons or function-key combinations to make your screen brighter or dimmer. The same goes for an external monitor. But you can't change your display's brightness through hardware, Windows 7 can do it for you, on the software side. In fact, Windows 7 can remember two separate screen brightness settings for mobile devices and laptops: one brightness while the machine is plugged into a power outlet (more bright, typically), and a different one while running on the device's battery (less bright, typically). We'll also show you how disable Windows' "Adaptive Brightness" feature -aka "
auto-dimming
"- from the Power options or Services.msc applet.
Quick Steps to change display brightness in Windows 7:
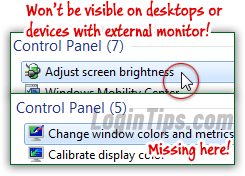 On the software side, Windows 7's Control Panel lets you adjust the brightness by dragging a slider with your mouse. To get to that screen, open the start menu and type "
bright
" in the search field: click on the "Adjust screen brightness" link at the top.
If you don't see that option, you are either using a desktop computer, or a laptop / tablet that currently has an external monitor plugged into it. In those cases, Windows 7 relegates changing the display's brightness to the hardware itself.
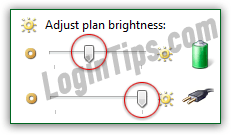
When the "Select a power plan
" screen opens in the Control Panel, notice that you have a slider at the bottom of the window: regardless of your current power settings, you can drag an "Adjust plan brightness" slider left (dim) or right (bright) to change the display's actual brightness:  The change will take place in real time, as you drag the slider; just close the Control Panel window once you've found a brightness level with which you are satisfied!
Tip: while running on battery, your monitor's brightness is one of the fastest way to empty or save your battery life. Pick as low a brightness setting as you can to prolong battery life.
Based on your current "power plan" for Windows 7, you'll get a brightness that takes full advantage of your display or, conversely, conserves power consumption and/or battery life. To view and optionally change those settings, click on the "Change plan settings" link next to the selected power plan: 
On the next screen, drag the individual slider for "brightness while running on battery" (left), and "brightness while plugged in" (right). Click on the "Save changes" button when you are done:  From now on, when you unplug your notebook, the brightness will change (dimming it is generally the good choice), and when you plug it back in, it will go back to the brighter state you picked!
 Unless you are using a desktop computer, the "Mobility Center" will be enabled in your copy of Windows 7. You can search for it in the start menu, or launch it using its dedicated keyboard shortcut of
  +X (hit the X key while holding down the key).
The first setting on the left is a slider: adjust your display's brightness by dragging it, and close the Mobility Center. (Notice that it also contains other useful shortcuts for mobile computing, like turning off Wi-Fi, switching to presentation mode, etc.)
 In addition to saving your batteries by using a lower brightness setting while not connected to a power source, Windows 7 includes an "adaptive brightness" feature that -assuming that your hardware supports it- will automatically dim or brighten your screen based on ambient light conditions. While auto-brightness is great for battery life, it is often annoyingly distracting. So here's how you turn it off, should you wish to do so. From the Control Panel screen that lets you customize your power plans, click on the selected (current) power plan, and click on the "Change advanced power settings" link. (By the way, the screenshot below is what the power plan screen looks like on a desktop PC - no "on battery" options displayed.)
Scroll through your settings and expand the "Display" settings, by double-clicking on it or by clicking on the "+" plus sign next to it. To disable auto-dimming, expand the "Enable adaptive brightness" option and set it to "Off" under "On battery" and/or under "Plugged in". 
FYI: unless you are running a custom piece of software to control light sensors on your hardware, you can access (and disable) Windows' "Adaptive Brightness" service altogether. From the start menu, type "services.msc" and hit Ctrl+Shift+Enter . Find and right-click on the Adaptive Brightness entry; choose "Properties" and pick "Disabled" a Startup type:
