 >
>  > > >
> > >  By default, (before you device to move them yourself), emails are stored in your inbox, and perceived junk mail is moved to the Spam folder. But Yahoo Mail lets you create "mail filters" (aka "
email rules
") that automatically move messages to a folder of your choice based on up to four criteria, called "conditions
". These allow you to filter incoming messages by sender (name or email address), recipients (To and Cc), the subject line, or the email body itself (message content). These are a great time-saver you can use to move newsletters to a "Read Later
" folder. We'll show you how to create and edit/rename filters, how to change their priority, and how to permanently delete them, or temporarily disable them with a simple trick. These filters can also work in conjunction with the much more powerful rules you can create in desktop email programs for Windows, Mac OS X, or Linux.
Quick Steps to create a filter in Yahoo Mail:
 Once you are logged into your Yahoo email account, move your mouse above the gear icon in the top right corner of the page, and choose "Settings" from the menu. A popup will open in the middle of the page: select "Filters" in the left pane. You'll see a list of all email rules you've setup in the past. By default, you'll just see an empty scroll box (Sort incoming messages into folders) with a few buttons that looks like this when it is still empty:
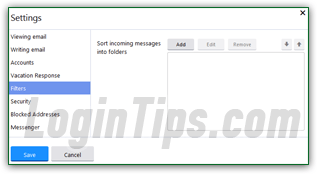
Click on the "Add" button to create a new mail filter: the "Add New Filter" dialog lets you configure up to four conditions (matching criteria) to target incoming mail - you need to supply at least one condition, and you can enter up to four of them for very specific filters. Start by typing a Filter name: 
 Below are the four conditions you can set up: each of them supports four different ways to match that type of information. Picking "contains" from the dropdown is the most flexible approach, since your filter will trigger if it finds some text anywhere in the field. Alternatively, you can pick "does not contain" (not recommended), "begins with", or "ends with" to match a pattern.
@yahoo.com", for example, would match messages from everyone who emails you using a
yahoo.com email address - but not yahoo.ca). 
Tip: if you check the "Match case" checkbox for any condition, Yahoo Mail will only filter (or ignore) the message if your capitalization matches exactly the one used in the message. This would make a difference in very few cases, and it will have unintended consequences: we recommend that you leave it unchecked!


You are now done with the conditions of your rule: review them to double-check for errors or inconsistencies. We'll now choose where to move any emails that our filter matches:
Yahoo Mail filters unfortunately only include a single, possible action: that's to automatically move the emails matched by the rule(s) to a specified folder. Pick a an existing folder from the "Then move the message to this folder" dropdown menu. Tip: if you want to automatically delete matched messages, just pick the Trash as destination folder! Don't panic if you forgot to create a destination folder before creating the rule: in that case, just pick "[New Folder]" at the bottom of the dropdown. Type your new "Folder name" in the popup, and click OK: your email filter is now complete! 
Click on the Save button to create your new filter, and you'll see
your new rule added under the name you typed in the first text
box. Click Save once more to close the Settings dialog.
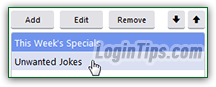
Yahoo Mail will run all your filters whenever a new message comes in: the up and down arrow buttons you see in your Filters settings aren't there for esthetic reasons, or to keep your filters sorted alphabetically. They literally give you control over the order in which they'll run (the one listed at the top will run first, and so on). Customize their order based on each filter's priority: 
To edit any mail filter, either click on it to select it and click on Edit, or double-click on the filter and the listing. To rename it, just type a new "Filter Name" and click Save.
If you want to quickly add a new filter based on the sender and/or subject line of a particular message, just right-click on it and choose "Filter Emails Like This" from the context menu. An "Add Filter" popup will open, with the "From" field automatically filled-in with the sender's email address, and the "Subject" automatically filled-in with the email's title. Give a Filter Name to that rule, optionally erase the From or Subject if you don't need it, pick a move-to folder, and click Save to add the new filter!  That's the quick way to setup a new email rule. If you don't happen to have a message to use as template, don't worry: just create everything from scratch, as we explained in the previous section.
 Yahoo Mail's webmail client (the web-browser-based version of the service) keeps things simple when it comes to filters. But you have many more filters at your disposal by using an email program like Microsoft Outlook, Windows Live Mail (even Outlook Express), Mac Mail, Thunderbird, etc. You just need to setup your Yahoo email account, as IMAP, using your Yahoo Mail server settings. This would allow you all kinds of new actions, whose limits are set by your desktop email program, no longer by Yahoo Mail!
 To illustrate, here are some of the actions available in Outlook 2007 / 2010 / 2013: move message to a folder, assign category, clear category, move to trash, permanently delete, copy the message to a folder, forward the message, forward message as attachment, auto-reply to the message (like a vacation reply), flag or unflag messages (star / unstar), assign an importance (aka priority level), automatically print the message (!), play a sound, automatically start a desktop application, automatically mark the message as read, run a script, etc. As you can tell, the possibilities are truly amazing! Keep that in mind before handling mail with Yahoo Mail's own filters. And remember that this is most useful when using IMAP.
 From the same Settings dialog (with Filters selected on the left), click on one of your email rules to select it, and click "Remove". This deletion is permanent, so if your goals is to just temporarily disable a filter, edit it by adding an unmatchable condition.
Note that deleting an email rule from the listing won't affect messages that were already moved by it in the past. The only effect is that this filter will no longer run: messages that it would have moved will be left in your inbox, unless another, active filter matches and moves them.
Caution: make sure that the correct filter is selected before clicking Remove, because Yahoo Mail will not display a final confirmation message before deleting it! (Even clicking Cancel in the Settings dialog won't roll back the change and restore filters you've just deleted.)
 Tip: notice that whenever you click on a filter to select it, Yahoo Mail displays a quick summary of the conditions and action this filter represents. This will be useful in six months, when you can't remember what a particular mail filter does (one more reason to name them logically!)