 >
>  >
>  If you check messages from multiple email accounts and Yahoo Mail is one of them, there's no need to login and logout from each of them. Yahoo lets you check messages from other email accounts, and even send messages from those, while logged into your Yahoo account! (Note: this is different from the alternate email account you can add to regain access to your account, for example.) This tutorial will show you how to add a "send-from account", as these are called, and optionally make it the default "send" email account. Of course, Yahoo will verify that you do own (or have access to) the email account before it adds it!
Quick Steps to add a send-from email account to Yahoo Mail:
 First, log into the Yahoo Mail account from which you want to be able to send messages using multiple accounts. From your inbox, click or mouse over the gear icon near the top right corner of the page, and select "Settings".
When the Settings dialog opens, select the "Accounts" options on the left.
Then, click on the Add button near the bottom: a popup will open and collect various information. 
 The "Sending Name" is up to you, but should ideally match the "display name" of the account you are adding (see note about "reply-to" address below).
The "Email Address" is the one for the account you are adding, not the Yahoo email account to which you are currently logged in. The "Description" is just a nickname you pick for the send-from email account.
Note: by default, Yahoo Mail makes the reply-to account your own Yahoo Mail account. However, in many cases it will make more sense to use the send-from account as reply-to. If you want to receive messages from that account into your Yahoo Mail inbox, you can either check the "Set up to Receive emails" checkbox (process explained in a later tutorial), or forward messages from that account to your Yahoo account. When you are done, click on Save to add that new email account: 
FYI: when you send emails, they contain "meta information" that lets mail servers know where to deliver messages, keep track of their thread ID (unique identifier for conversations), etc. One of those "email headers" is thereply-todirective. When it is omitted (default), replies to a message will automatically go to the account used to send it.But it can be used to instruct mail providers that the replies should go to another account - this is what Yahoo Mail uses when it collects the reply-to address. If you are curious about those, you can right-click on any message in your inbox, and choose "View Full Header" from the context menu!
As soon as you do, you'll receive a "Check [email address] for a confirmation mail from Yahoo Member Services. Click the link in the email to enable sending mails from this account. If you don't see a confirmation email, try resending it
" message. This is designed to prevent anyone from adding an email account to which they don't really have access. Click OK. Until you go click on the link Yahoo sent to your other account, it will remain "unverified" in Yahoo Mail - and you won't be able to use it. 
Once you clicked on the verification link and got the "Thanks [your user name]! Your email address is now verified. You have successfully added an email address to your Yahoo account
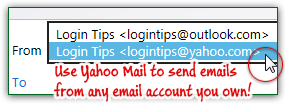
" confirmation message, you can start using your new send-from account. Just compose a new message as you normally would, but notice that you now get a dropdown menu that lets you pick the "From" account: 
Note: if you don't see a "From" dropdown menu, or if it doesn't show the latest email address you've added and verified, just refresh the page (hit F5 on Windows / Linux, or Cmd+R in Mac OS X).
By default, the Yahoo email account in which you logged in remains the default email account from which all new messages will be sent. (If you added another email account from which to receive mail, replying-to, or forwarding, one of its message will automatically use that recipient account as "From" account.) To make another email account the default send-from for new messages, just select it from the "Default sending account", also under the Accounts options. Click Save when you are done: 


